Lesson 7: REPL Crash Course
In the previous lesson, we learned how to use Figwheel to reload code whenever a source file changed, enabling a very quick feedback cycle. In this lesson, we will take a first look into a tool called a REPL, which stands for Read-Eval-Print Loop and is conceptually similar to the JavaScript console that most browsers provide. While live reloading is a great help when we already have a good idea of the code we need to write, the REPL gives us an environment for writing more exploratory code - trying out ideas and algorithms before making them part of our project. Just like unit tests, REPL development allows us to test a piece of code in isolation, examining its output and making sure that it matches our expectations. However, unlike unit tests, the REPL is more interactive and provides even quicker feedback.
In this lesson:
- Understand what a REPL is and to use it
- Use Figwheel’s REPL to experiment with new code
- Learn how the REPL interacts with a web browser
Understanding the REPL
As we mentioned above, REPL stands for Read-Eval-Print Loop because it Reads each expression that we type at the prompt, Evaluates that expression in the context of a web browser, Prints the result of that expression back at our command line. This process is illustrated in the figure below:
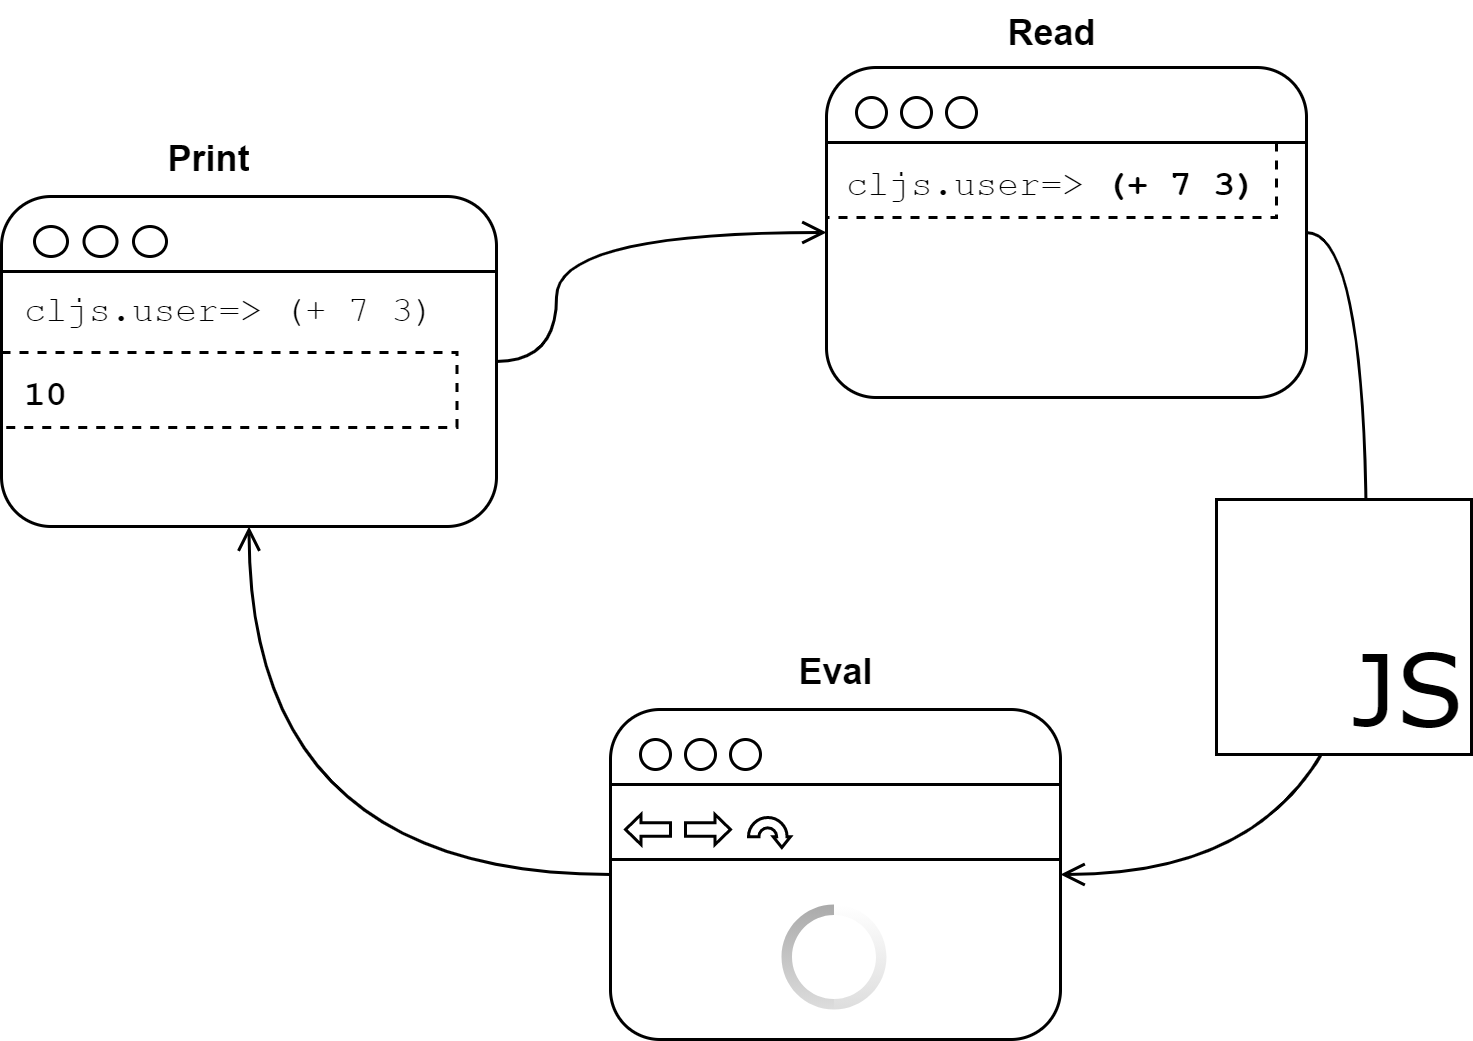
The Read-Eval-Print Loop
First, the REPL waits for input from the user. Once we have input a ClojureScript expression, it compiles the expression to JavaScript and sends the JavaScript code to a web browser (via a WebSocket) to be evaluated. Once the browser evaluates the JavaScript code, it sends the result back to the REPL. Finally, the REPL prints the result and waits for more input from the user. This loop continues until the REPL is killed or the browser that it is connected to is closed. Remember that the ClojureScript REPL is only in charge or the Read and Print portions, and it needs a browser to perform the Eval step, so if you kill the browser, the REPL will not be able to evaluate anything else until you open a browser that it can connect to again.
NOTE
There are several different REPL options with ClojureScript, but we will be using Figwheel throughout this book. Much of the information will apply to any REPL, but be aware that other REPLs may function slightly differently. Notably, it is possible to run a REPL that uses either Node.js to evaluate compiled JavaScript.
Simply providing a REPL is not all that interesting. After all, Ruby and Python have REPLs (or “interactive interpreters”), and every modern browser has a JavaScript REPL built into its development tools. What makes a REPL unique for ClojureScript is that ClojureScript is a compiled language. That means that the REPL reads ClojureScript, compiles it to JavaScript, evaluates the JavaScript code, and prints the result back in the ClojureScript REPL all completely seamlessly. Other compile-to-JavaScript languages commonly offer an online interface for pasting in portions of code and viewing the JavaScript that the code would compile to, but ClojureScript is in a league of its own when it comes to giving the developer a dynamic, interactive programming environment. Using the REPL, we can have confidence that the code does exactly what we want it to do in the browser that we are running.
Using a REPL for browser interaction
In order to load a ClojureScript REPL, we’ll use the same learn-cljs/weather app that we have been using through this unit:
$ cd weather
$ clj -A:fig:build
In most cases, Figwheel will be able to open a browser tab directly, but if it did not do so, please open a browser and visit http://localhost:9500 so that our REPL can connect and start evaluating expressions.
A ClojureScript REPL instantly compiles the code that we type in to JavaScript and evaluates it in the context of a browser. In the previous lesson, we started Figwheel, opened a browser, and navigated to http://localhost:9500. We used this setup to reload our code every time we saved it, but Figwheel also started a REPL in the terminal that can communicate with the web page. In order to use REPL, we can simply start typing expressions into the terminal window where Figwheel is running, and it will execute in the context of the page in which our application is running. Additionally, we can interact with our application code and even change it on the fly. A typical ClojureScript development cycle follows these steps:
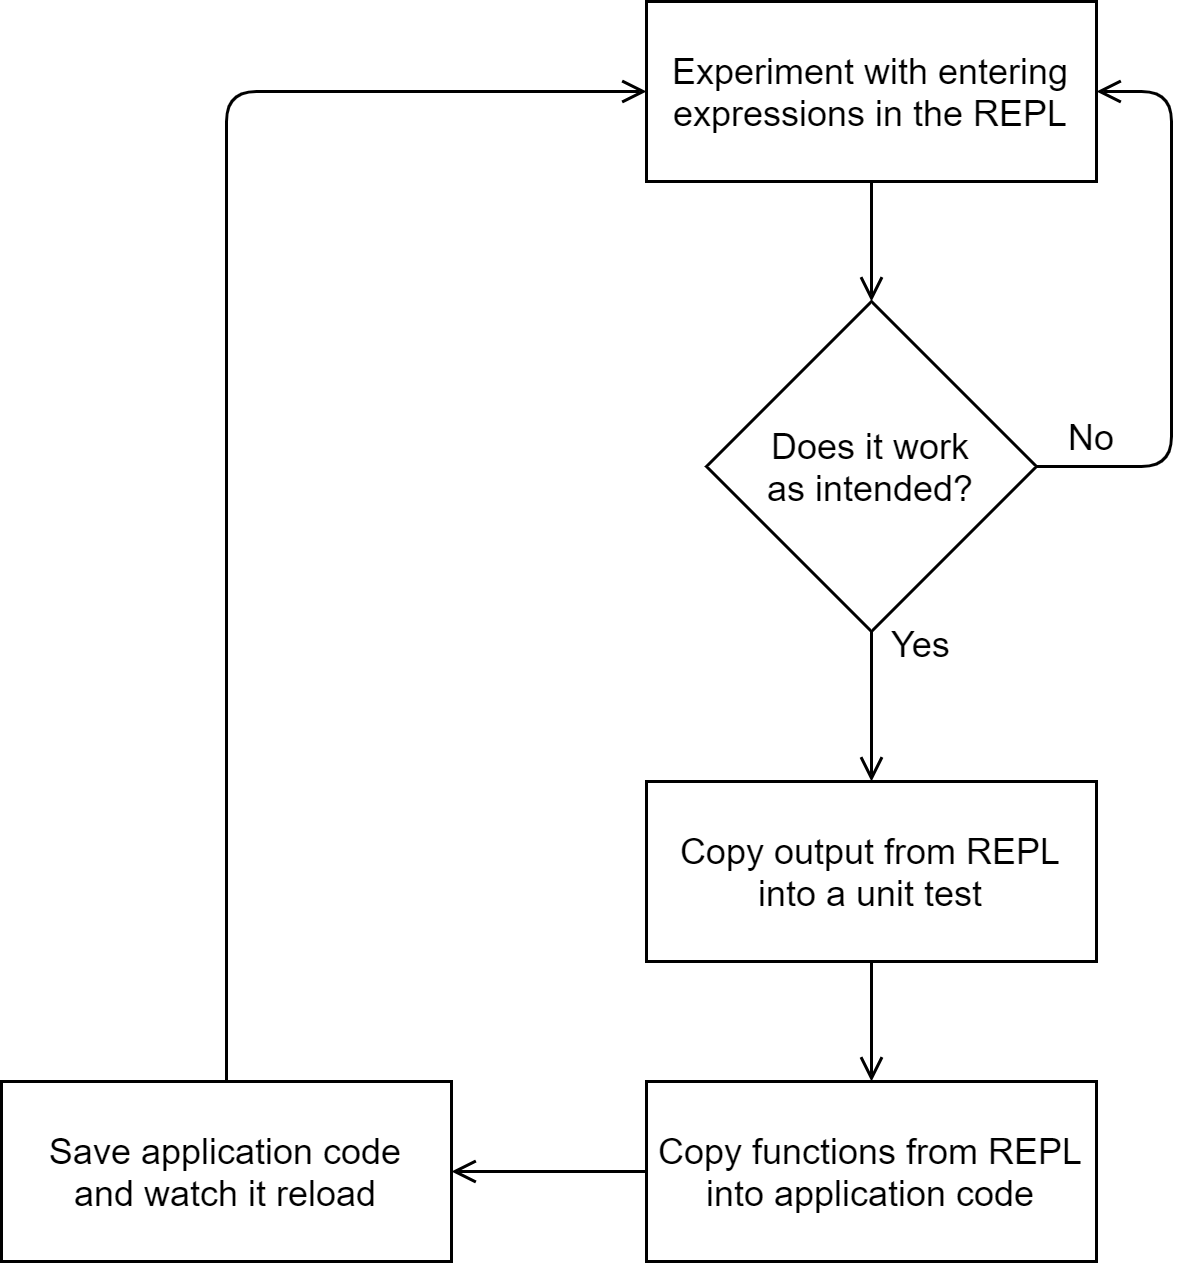
REPL-Driven Development Workflow
While we will not use this full workflow in this lesson, we will explore the REPL to see how we might use it for exploratory development. Once Figwheel is running and we have loaded our app in a browser, we should make sure that we can see both Figwheel and the browser. Since we we using the REPL extensively, let’s take a moment to make sense of its command-line interface:
Breaking Down the REPL
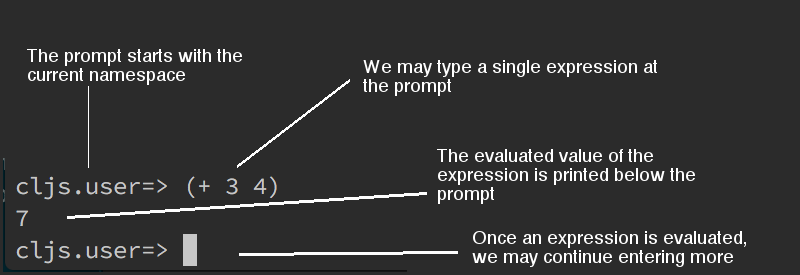
When the REPL starts up, it will display a prompt that has the namespace, cljs.user, followed by a fat arrow, =>. As mentioned in passing earlier, the namespace is the fundamental unit of modularity, which is used for grouping similar functions and data together. Whenever we define functions or data, they are added to some namespace. Unless we manually change the namespace, anything defined at the REPL gets added to the cljs.user namespace so that we do not accidentally overwrite the code powering the running application. After this prompt, we can start inputting expressions one at a time. An expression can span multiple lines, but as soon as we conclude the expression, the REPL will evaluate it and display the result on the next line. There are some expressions that are only run for side effects and have no meaningful value, such as (println "Side effects!"). In this case, the REPL will print the string, “Side effects!", and return nil, indicating that the expression itself has no value.
In order to change to a different namespace, we can use the in-ns function. This function takes as an argument a symbol with the name of the namespace to enter and changes the REPL’s environment to that namespace. For example, to change into the main namespace of our application, we can simply enter (in-ns 'learn-cljs.weather).1 To draw an analogy to a filesystem, a namespace is like a directory, defining a var with def or defn is like creating a new file, and in-ns is like using cd to change into a new directory. Once in the new namespace, we have access to all the vars defined in it, and any new vars that we define will be defined in that namespace.
You Try It
- Start a Figwheel REPL from the command line
- Enter some basic expressions - remember that things like numbers and strings are expressions.
- Enter the
learn-cljs.weathernamespace, then return to thecljs.usernamespace.
Running Code in a Browser
Notice that when we start Figwheel, it opens a web browser before it can load a REPL. Why did we need a browser to use a REPL? Figwheel itself does not execute the ClojureScript code. Instead, it orchestrates the process of compiling the code to JavaScript, sending it to the web browser for execution using the browser’s JavaScript engine, then displaying the results back in the terminal window.
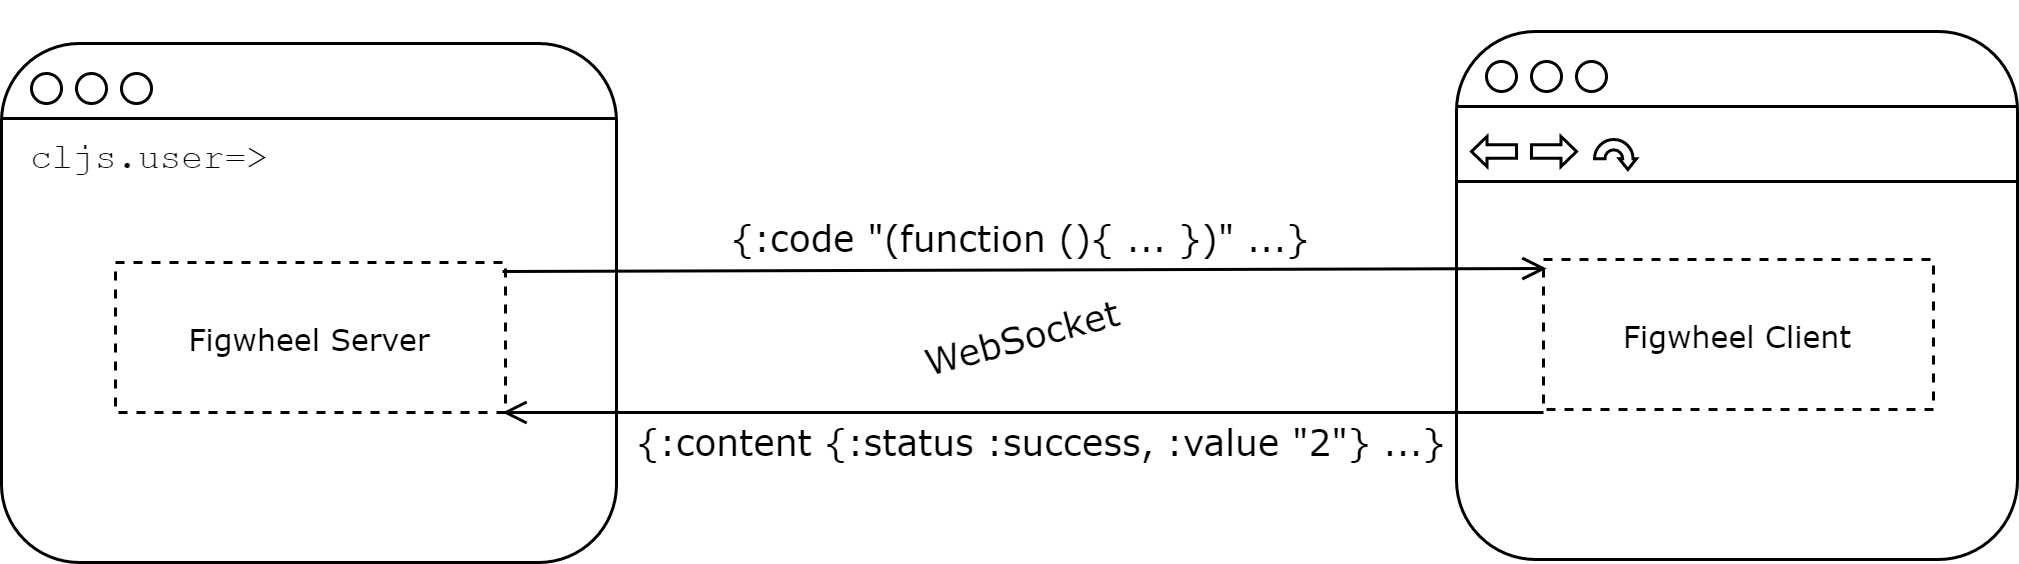
Figwheel Client/Server Communication
When we enter an expression in the REPL, Figwheel invokes the ClojureScript compiler to generate a piece of JavaScript code. It then sends this JavaScript code over a WebSocket to the web browser, which the browser evaluates and passes back over the WebSocket to the Figwheel server. If there are any exceptions raised while running the compiled JavaScript, the error output is sent back to Figwheel for us to look at.
This may seem like unnecessary indirection, but it is actually very useful for a couple of reasons. First, we can have confidence that our code will actually do the right thing in the context of a web browser, and second, we can manipulate the browser directly from the Figwheel REPL. We will now try a few more examples, this time with some DOM manipulation.
(in-ns 'learn-cljs.weather)                                ;; <1>
;; nil

(def input (.createElement js/document "input"))           ;; <2>
;; #'learn-cljs.weather/input                              ;; <3>

(.appendChild (.-body js/document) input)
;; #object[HTMLInputElement [object HTMLInputElement]]

(set! (.-placeholder input) "Enter something")             ;; <4>
;; "Enter something"

(defn handle-input [e]                                     ;; <5>
  (swap! app-state assoc :text (-> e .-target .-value)))
;; #'learn-cljs.weather/handle-input

(set! (.-onkeyup input) handle-input)
;; #object[learn_cljs$weather$handle_input ...]
Browser interaction from the REPL
- Enter our app’s main namespace
- Create an
inputelement and add it to the DOM defevaluates to the var that was defined- Change the
placeholderproperty of the element - Create an event handler and attach it to the
input. Note that this expression spans multiple lines.
After evaluating all of these expressions in the REPL, we will have a heading and an input in our app, and whenever we type something in it, the h1 will be updated with whatever we type. This is powerful because now we have some code that we know works, and we could simply copy statements from our REPL session and paste them into our application. However, we could even do some refactoring in the REPL before pasting the code into our application. Whenever we redefine something in the REPL, it will affect the running application, so there is no need to refresh the page before we start redefining code. However, if we have added any event listeners or have otherwise modified the DOM, we may want to refresh the page to return to a “clean slate”. In our case, we will only be refactoring the handle-input function, so we can continue without reloading the page.
Quick Review
- In your words, explain what happens after you input
(+ 40 2)in the REPL and hit enter. - Look up
https://clojuredocs.org/and try running some of the examples in the REPL. Most of ClojureScript’s library is identical to Clojure’s, so most of the examples will work the same in either language.
IMPORTANT:
Anything that we have defined in the REPL will only last until we close or refresh the web browser, so if we want to discard everything that we have defined in the REPL, we can simply refresh the browser. Conversely, when in the middle of an involved REPL session, we should take care to not refresh the browser, lest we lose the state that we have built up.
We will probably want to get the value of some input that triggered an event in multiple places, so we can extract that into its own function. We can also make the intent of the event handler clearer if we extract the updating of the app state into its own function as well.
(defn event-value [e] (-> e .-target .-value))
;; #'learn-cljs.weather/event-value

(defn update-text [value]
  (swap! app-state assoc :text value))
;; #'learn-cljs.weather/update-text

(defn handle-input [e]
  (update-text (event-value e)))
;; #'learn-cljs.weather/handle-input
From this short REPL section, we now have some clean, refactored code that we could use in our application. Almost all code needs to be refactored, but the REPL-driven style of development enables us to refactor very early in the development process so that by the time we write a unit test or paste the code from the REPL into an application, it is already clean and concise. The earlier we are able to clean up our code, the less technical debt we accumulate, and ultimately, the more productive our development becomes.
Summary
In this lesson, we explored how to use the REPL to interact with a web page. We used it both to try out new code and to interact with code in our application’s main namespace. As with any skill, practice is key to developing the competence that eventually leads to mastery, and ClojureScript’s REPL is one of the best ways to practice new skills. Moving forward, we will introduce almost every topic with a REPL session. We can now:
- Start a Figwheel REPL from the command line
- Understand how code entered in the REPL gets evaluated
- Write and refactor code in the REPL before committing it to our project