Lesson 5: Bootstrapping a ClojureScript Project
Until this point, our discussion of ClojureScript has been largely theoretical. We have an idea of why we would want to use ClojureScript, but what does it look like in action? Over the course of this section, we’ll develop a small weather forecasting application from scratch. We will pay attention to the high-level concepts while leaving the discussion of the particulars until later. At this point, we are interested in getting used to the look of ClojureScript code, identifying how it makes things that are difficult in JavaScript easier, and how the tooling helps streamline the development process. Although the syntax of the application may still seem a bit foreign, we’ll start to get a feel for how fun and productive a ClojureScript project can be.
In this lesson:
- Walk through setting up a project from scratch
- Learn how to use the ClojureScript compiler to build your code
- Bootstrapping with clj-new
To start out, we will learn how to create and build a ClojureScript project. Just as the carpenter must be familiar with all of his tools before he can create a masterpiece, we must get acquainted to the tools of our trade. Coming from the glut of tools that we need for JavaScript development, it should come as a relief that there are only a few key tools that we need for any ClojureScript project.
Meeting clj
Each language has its own set of tools to learn, and ClojureScript is no different. In this book, we will focus on two very important tools - clj for general-purpose build tasks, and Figwheel for live reloading of code. We’ll begin by looking at our new friend clj, the built-in command-line tool for managing dependencies and building code. Like JavaScript’s npm, clj is a configuration-based dependency manger as well as a simple build tool. The reader who has some familiarity with building software projects should feel at home rather quickly, but do not worry if this is your first exposure to using a build process. We will walk through the essentials in enough detail to get comfortable building ClojureScript applications.
The Clojure language comes with a command-line tool that can be used for compiling both Clojure and ClojureScript. While other build tools exist, the clj tool is the defacto option. It is a simple tool, but it is powerful enough to use even on a large project. We will use it for managing dependencies, compiling, and testing our projects. Using a single tool for all of these concerns should come as a welcome change from the proliferation of tools in the JavaScript landscape. Before proceeding any farther, we should install Java and Clojure. Since instructions change slightly with each release, readers are encouraged to follow the most recent instructions at the official Clojure Getting Started Guide. One interesting feature of ClojureScript is that we do not need to install it manually - we only need to specify it as a dependency of our project. Once Clojure is installed, we can create a new project.
Creating a Project Manually
While there are tools available to create a skeleton project from a template, we will first set up our project manually so that we can better understand what is going on under the hood. First, we will need to create a new directory and enter it.
$ mkdir my-cljs-project
$ cd my-cljs-project
Next, we will need a deps.edn file in this directory. This file is the equivalent of a package.json in the JavaScript tooling community, and it specifies the list of the dependencies that our project requires as well as the location of our source code and script aliases. The .edn extension indicates that the file uses Extensible Data Notation - a file format containing ClojureScript data structures. Let’s create a bare-bones deps file now:
{:deps {org.clojure/clojurescript {:mvn/version "1.10.773"}}
 :paths ["src"]}
deps.edn
The :deps entry contains all of the dependencies that our project needs. In this case, we are requesting a recent (as of the time of this writing) version of ClojureScript. Don’t worry too much about the format of the deps map, since most packages will provide you with an entry to paste into your deps file.
The :paths entry instructs the ClojureScript compiler where to look for code. If we had any tests, we would add the path to our tests to this vector as well.
Now, let’s create our first source file and compile it! Create a file called src/my_cljs_project/core.cljs, and type in the following contents:
(ns my-cljs-project.core)                                  ;; <1>

(js/alert "Hello World")                                   ;; <2>
src/my_cljs_project/core.cljs
- Namespace declaration
- Trigger an alert
By default, our application will get compiled to out/main.js, so let’s create a simple HTML page to load this application.
<!DOCTYPE html>
<html>
  <head>
    <meta charset="UTF-8">
  </head>
  <body>
    <script src="out/main.js" type="text/javascript"></script>
  </body>
</html>
index.html
Now, we will compile our ClojureScript file and load the script in a browser. All of this can be done with one command:
$ clj -m cljs.main --compile my-cljs-project.core --repl
When you run this command, you should be greeted by an empty page that pops up a “Hello World” alert! Let’s break this down so that we understand what this command is doing.
cljThis invokes the Clojure command-line tool.-m cljs.mainThis flag specifies the function to run. When we includedorg.clojure/clojurescriptas a dependency in thedeps.ednfile, it instructedcljto download the ClojureScript compiler.cljs.mainis the function that invokes the compiler itself. The remaining flags are interpreted by the ClojureScript compiler rather thancljitself.--compile my-cljs-project.coreThis specifies the namespace of the “entry point” of our application. Since we only have one file, we specify its namespace. Note that the namespace matches what we specified at the top of ourcore.cljsfile.--replThis flag does two things: first, it launches a web server to serve theindex.htmlfile and the compiled JavaScript; second, it starts a REPL, an interactive interpreter that we will learn about in Lesson 7.
NOTE
The terminal examples in this book are for a Unix-like environment such as OSX or Linux. Windows users may have to make minor adaptations the commands.
Using Aliases
While the clj tool offers us all of the options that we need to build and run our code, it is a hassle type out clj -m cljs.main --compile my-cljs-project.core --repl every time we want to start up our application. A deps.edn file lets us specify script aliases that allow us to declare a shorthand for a number of commands or even run a Clojure file.
;; ...
:aliases
  {:dev {:main-opts ["-m" "cljs.main"
                     "--compile" "my-cljs-project.core"
                     "--repl"]}}
deps.edn
With this alias in place, we can run our application with the following command: clj -M:dev.
Quick Review
- What is a
deps.ednfile, and what is its equivalent in the JavaScript ecosystem? - Explain each of the flags that were passed to
cljto run our application.
Understanding clj
Sticking with the Clojure philosophy of composing more advanced functionality from small, simple pieces, clj is a building block that has a well-defined purpose: managing dependencies and running Clojure code (including the ClojureScript compiler). There are other more fully-featured tools for project management, but with more features come more complexity. For this book, we will be sticking with clj and a tool called Figwheel, which we will introduce in the next lesson.
When we invoke clj -m cljs.main ..., several things happen. First, any dependencies specified in deps.edn will be downloaded. This download will only happen on the initial run, and the packages will be cached locally for subsequent runs. Second, the Java Virtual Machine will be started and the Clojure compiler loaded. Next, Clojure will load the code specified by the -m flag. In our case, we specify cljs.main, which is the entrypoint for the ClojureScript compiler. This code is available to us because we added the package for the ClojureScript compiler (org.clojure/clojurescript) to deps.edn.
After the -m cljs.main flag, the rest of the flags are interpreted by the ClojureScript compiler rather than clj itself. We will not present a reference for the ClojureScript compiler options here, but there is an excellent official reference at https://clojurescript.org/reference/repl-and-main. Instead, we will discuss the options that we need as they arise through the course of the coming lessons.
Bootstrapping a Project
Now that we have had a whirlwind tour of clj, let’s dive in and create our first simple project, a weather forecasting app. We will use a tool called clj-new to create the project from a template in order to eliminate the tedium of manually configuring everything. Just like with the ClojureScript compiler, we can make use of clj-new without explicitly installing anything. One additional feature of clj is that it allows aliases to be defined in ~/.clojure/deps.edn that are always available. Go ahead and create this file with the following contents:
{:aliases
 {:new {:extra-deps {seancorfield/clj-new
                     {:mvn/version "1.1.243"}}
        :exec-fn clj-new/create
        :exec-args {}}}}
~/.clojure/deps.edn
This will allow us to use the command clj -X:new to invoke the clj-new/create function provided by the seancorfield/clj-new package. clj-new requires a template name and a project name in order to generate the scaffolding for the project. Since we will be using Figwheel to automatically compile code and reload it as we make changes, we can use a clj-new template, which is a blueprint for the files and directory structure to create. By default there are several built-in templates for generating Clojure applications libraries, but we can specify other templates as well. When invoking clj-new with a template name, it will check to see if the template is a built-in one or not. If it cannot find a built-in template, it will try to find the appropriate template from a central repository, download it, and generate our project.
The Figwheel project provides a template that generates a ClojureScript project with all the plumbing required for live reloading. We will be using the Reagent library - an idiomatic ClojureScript wrapper around React - for building the UI, and thankfully the Figwheel template allows us to pass an additional argument to include Reagent boilerplate code in the generated project. We can now create the project for our app.
$ clj -X:new :template figwheel-main :name learn-cljs/weather :args '["+deps" "--reagent"]'
Since this command includes some unfamiliar syntax, let’s take a moment to dissect it. As we just learned, the first part of the command, clj -X:new, invokes the clj-new/create function, and the remainder of the arguments are passed to this function. We use Clojure keyword syntax to pass :template, :name, and :args options. :template unsurprisingly specifies the name of the template to use, :name is the name of the project to create, and :args are additional arguments that the figwheel-main template will interpret. Since figwheel-main is not a built-in template, clj-new will fetch the template from Clojure’s central repository, Clojars.
We need to understand a bit of convention in order to make sense of the structure of the generated project. Most Clojure and ClojureScript projects use a namespace-qualified package name to reduce the likelihood of naming conflicts between projects that are pushed to a central registry. The namespace is the portion before the forward slash and is commonly the GitHub username of the developer or the reverse domain name of the organization that owns the code, although it can be anything you like. For this book, we will use learn-cljs as the namespace for all of our projects.1

Project Namespace and Name
The final argument is a bit odd-looking: :args '["+deps" "--reagent"]'. This passes a vector of strings as arguments to the figwheel-main template. The exact arguments supported vary from template to template, but Figwheel uses these to configure optional extensions to the base template. In our case, we are specifying that we want to use a deps.edn file to manage dependencies, and we want to include the Reagent web framework.
Exploring the Project
We now have a running (albeit skeletal) ClojureScript project. To see the application that clj-new generated, we can navigate into the project directory and see what files were generated.
$ cd weather
$ tree -a
.
├── .gitignore
├── README.md
├── deps.edn
├── dev.cljs.edn
├── figwheel-main.edn
├── resources
│   └── public
│       ├── css
│       │   └── style.css
│       ├── index.html
│       └── test.html
├── src
│   └── learn_cljs
│       └── weather.cljs
├── target
│   └── public
├── test
│   └── learn_cljs
│       ├── test_runner.cljs
│       └── weather_test.cljs
└── test.cljs.edn
Exploring the Generated Project
Let’s go ahead and explore what each of these files and directories are for. We are already familiar with the deps.edn file, and the README.md and .gitignore files should be self-explanatory, but the other EDN files could use some explanation:
dev.cljs.edn- build file. Figwheel allows the use of separate build configurations that can be used to pass different options to the ClojureScript compiler. For example, we could use this file to configure development builds and use another file for production builds.figwheel-main.edn- Figwheel configuration file. This file provides configuration options to Figwheel itself.test.cljs.edn- build file. Likedev.cljs.edn, this file configures a specific build - in this case, the test build.
The src directory contains all of the ClojureScript source files for our project. Usually, there will be a single folder under src that shares the same name as our project’s namespace, and under this folder, there can be any number of *.cljs files and other folders. By default, the figwheel-main template creates a single <project-name>.cljs file in this directory. If we open weather.cljs in a text editor or IDE that supports ClojureScript 2, we will see something like this:
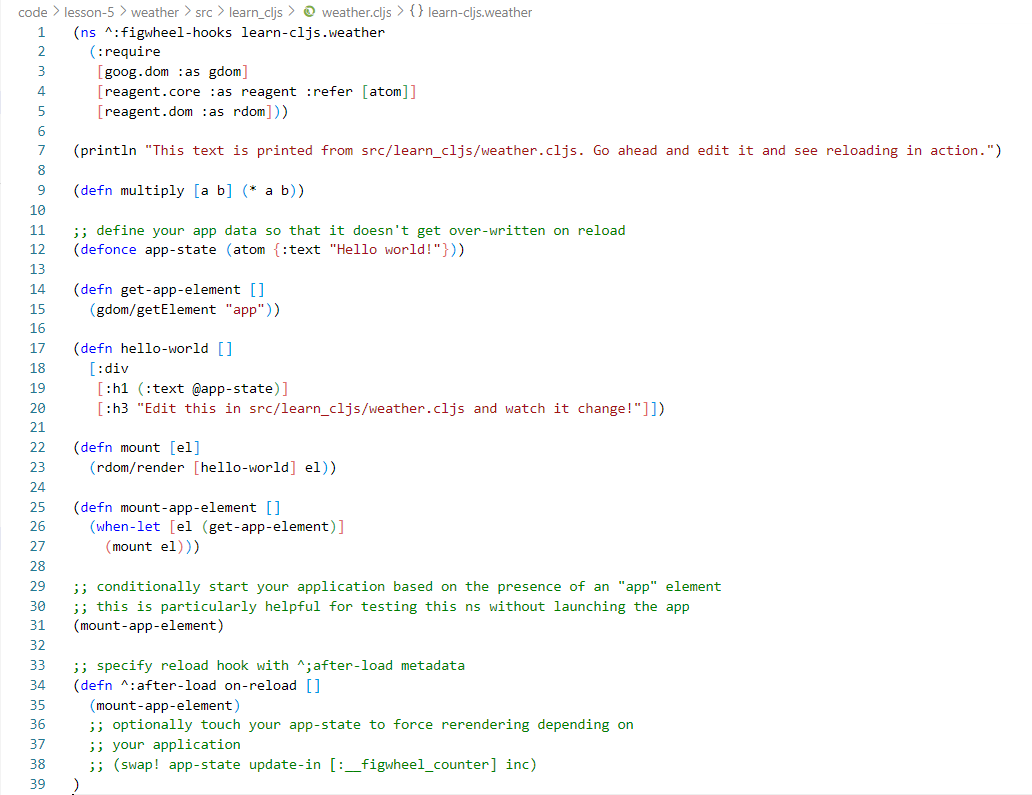
Editing core.cljs with VS Code
We will dig in to the rest of this file over the next couple of lessons, as we start to build out the weather forecasting app. For now, we will look at the namespace declaration at the top of the file, since it is closely tied to the structure of the project. Each ClojureScript file contains a single namespace, which is simply a collection of data and functions. The namespace is the unit of modularity in ClojureScript. If we open up the weather.cljs file that was created, we can see the namespace declared on the first line (ignoring the ^:figwheel-hooks bit for now): (ns ^:figwheel-hooks learn-cljs.weather). The ClojureScript compiler uses a simple naming convention for namespaces based on the name of the file that houses them:
- Take the file path relative to the source directory
- Replace the path separator ("/” on Unix-like systems and “" on Windows) with a dot, “.”
- Replace underscores, “_", with hyphens “-”
- Drop the filename extension, “.cljs”
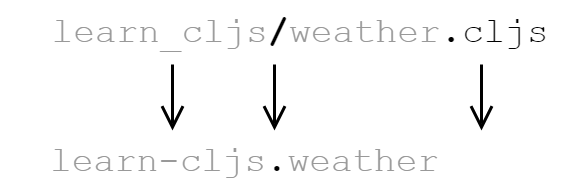
Filename to Namespace Convention
Hyphen or Underscore?
One detail that sometimes trips up newcomers to ClojureScript is the fact that we name directories in the project with underscores but we name namespaces with hyphens. This is a convention borrowed from Clojure, which compiles namespaces into Java classes, naming the classes according to their file path. Since hyphens are not allowed in Java class names, they are not allowed in the file paths either. ClojureScript follows Clojure’s lead and requires that hyphens in a namespace be converted to underscores in the filesystem path. It is a quirk, but it is one that is easy to live with once we are aware of it.
The resources/ directory contains all of the assets that we need to serve a website, including an index.html file, a stylesheet (which is empty by default), and once we build our project, a page for hosting a test runner. The index.html was created with a single div that we can load our application into, and it includes the JavaScript file that will load our application with its dependencies.
Quick Review
- What file would you change to tweak the markup of the page that will load your app?
- What file would you change to add project dependencies?
- What file would you create to add a
learn-cljs.weather.sunny-daynamespace?
Summary
In this lesson, we have walked through the process of creating a new ClojureScript project from scratch. We were introduced to clj, the built-in Clojure (and ClojureScript) build tool. We then looked at the clj-new project scaffolding tool, and we explored the project structure that it generated for us. Next, we will learn about Figwheel, the other core tool that will enable us to receive immediate feedback while we are developing. After that, we will be able to jump in with both feet and start writing code. We now know:
- How to set up a brand new ClojureScript project from scratch
- What sort of tasks are handled by the
cljtool - How to use
clj-newto to bootstrap a project from a template - How a typical ClojureScript project is laid out
You will sometimes see the namespace referred to as the “groupId” and the name as the “artifactId”. This has to do with the naming conventions used by Java’s Maven project management tool, which is what much Clojure tooling is built on top of. ↩︎
Most programmers’ text editors have a Clojure language package that can be used for ClojureScript, but if you prefer working with IDEs, Cursive is by far the most fully featured Clojure(Script) IDE available. ↩︎